【踩坑】從前端到後端,常見的列印與下載 pdf 檔案方法
8月 28, 2023
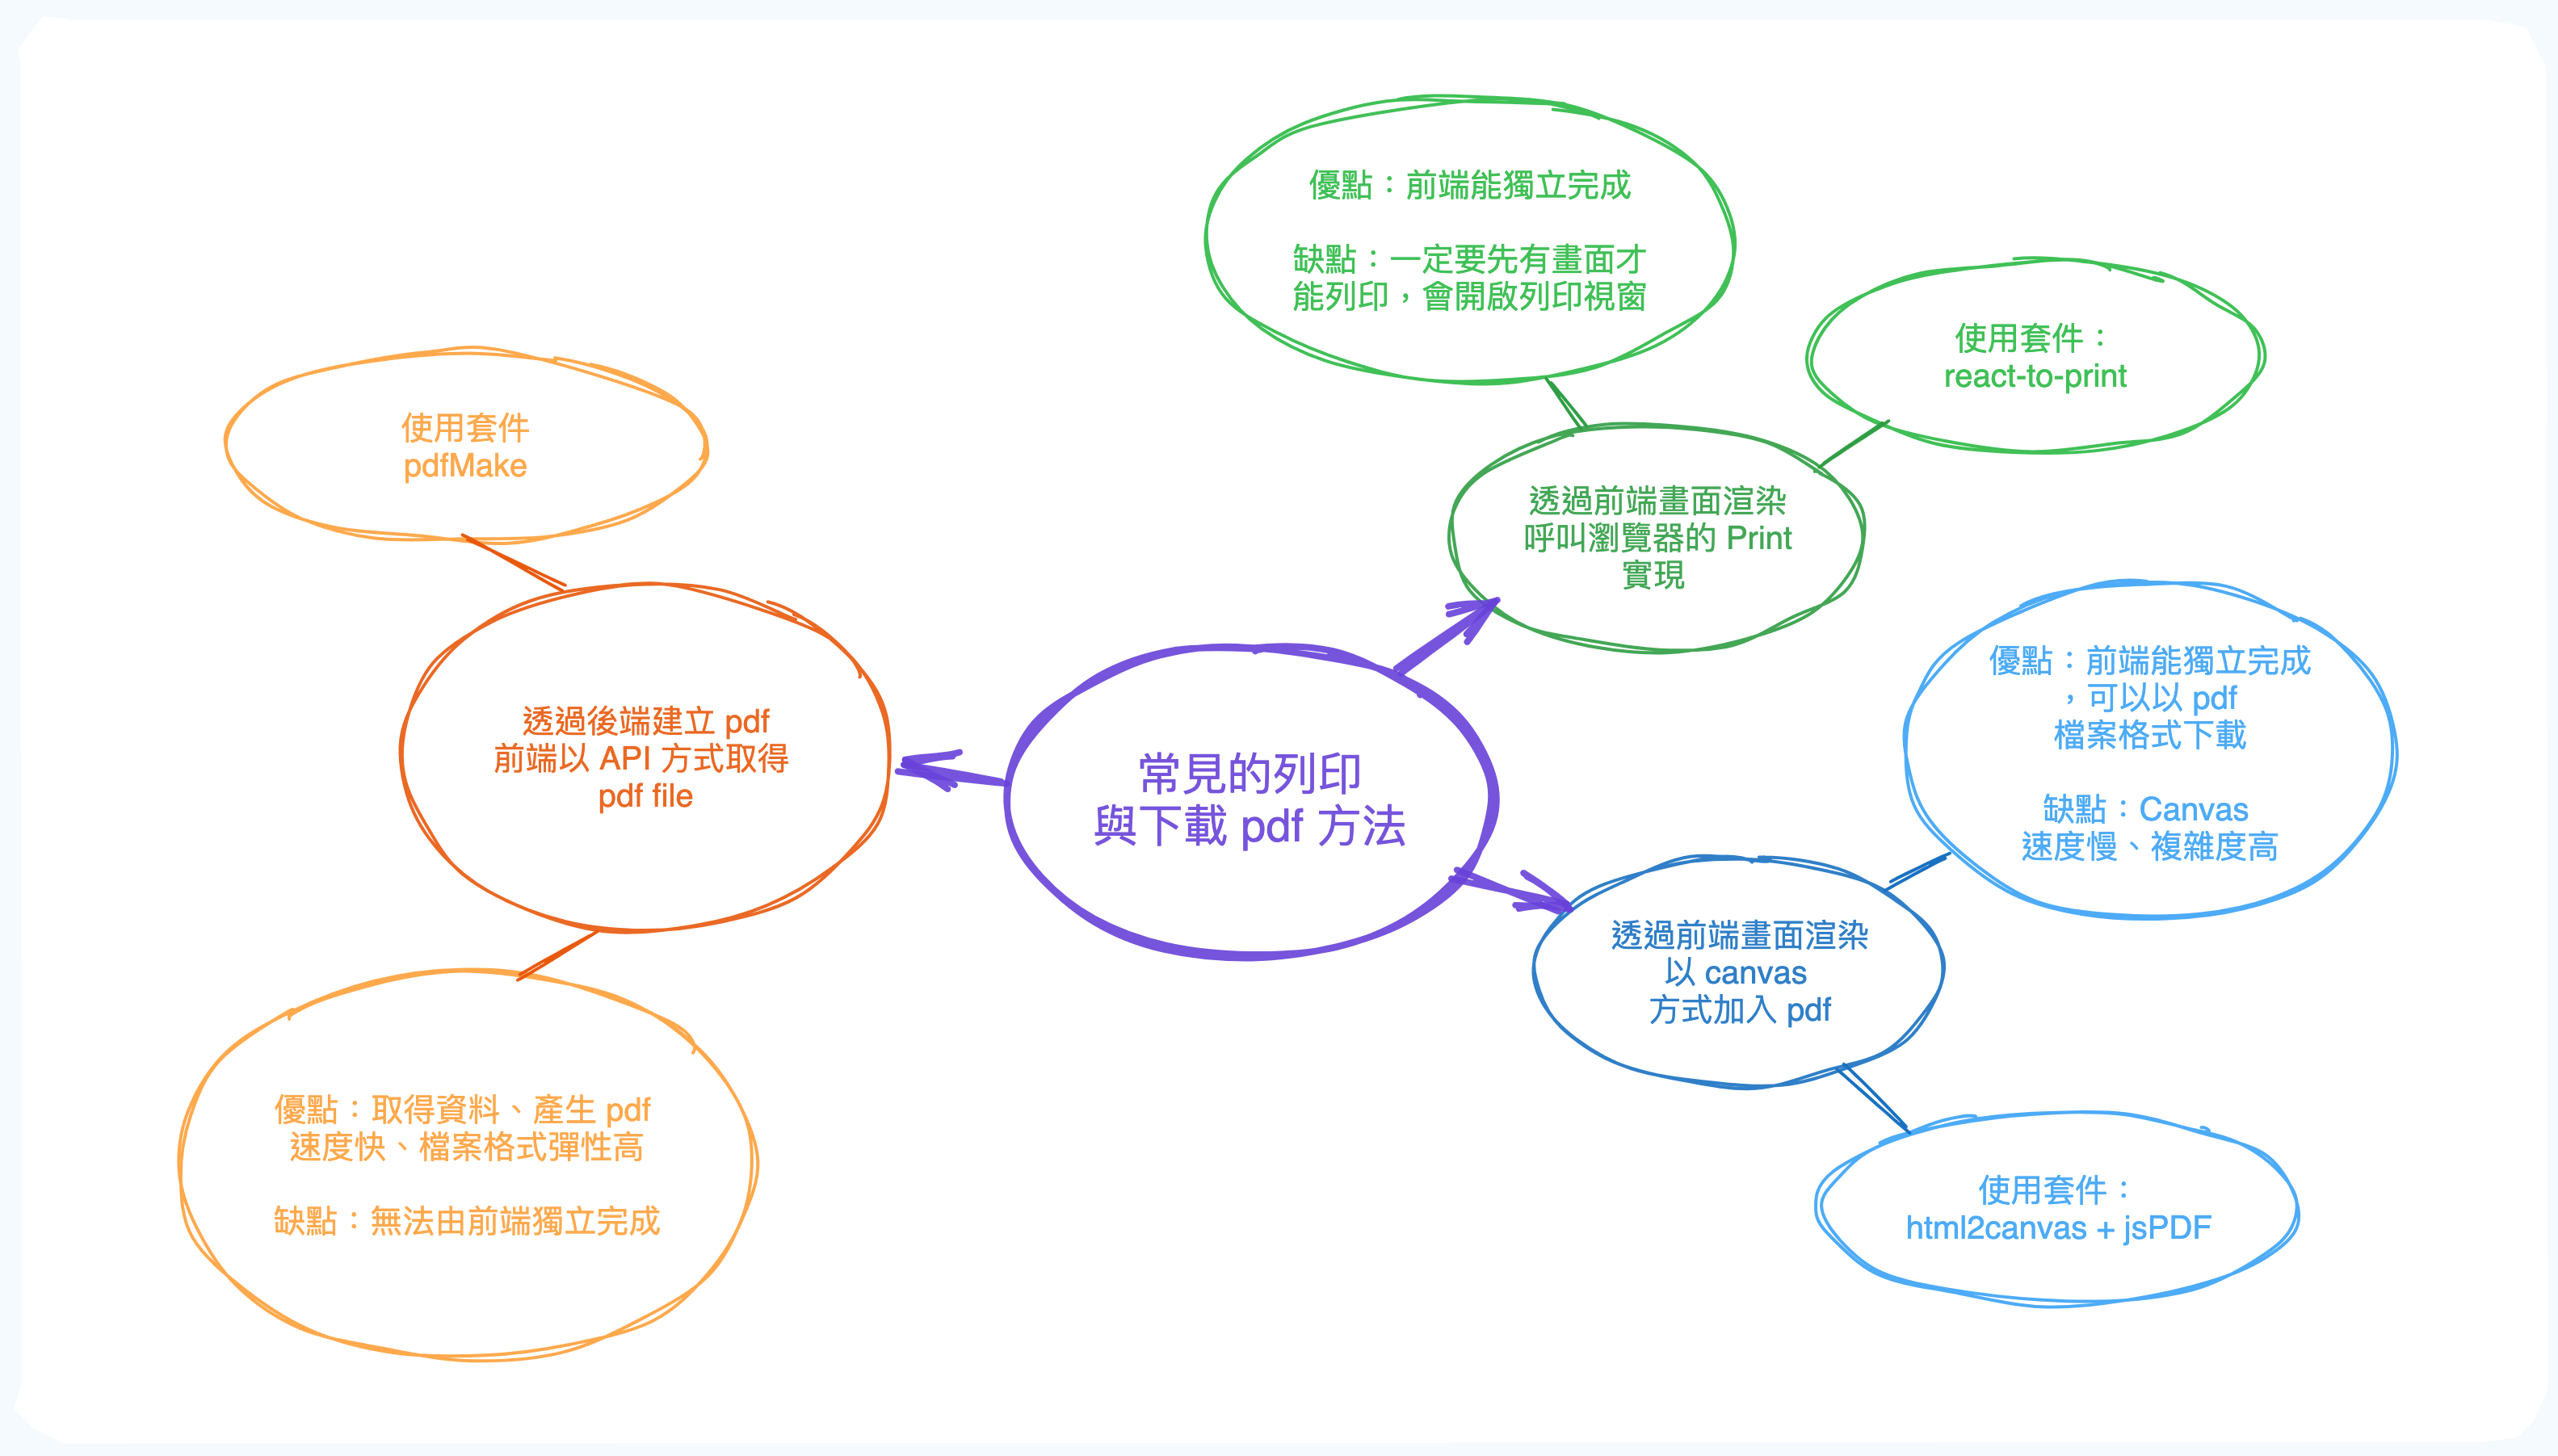
相信身為前端工程師,一定多少會遇到下載頁面的需求。在這一年多的開發經驗裡就遇到了形形色色至少五次類似的需求,逼人把這個技能刻在心底呀~ 當然在實作之前先了解 spec 到底需要的是什麼,是要開啟列印視窗、直接下載檔案,需不需要先預覽等等,以下分享幾個曾實作過的方法與區別。
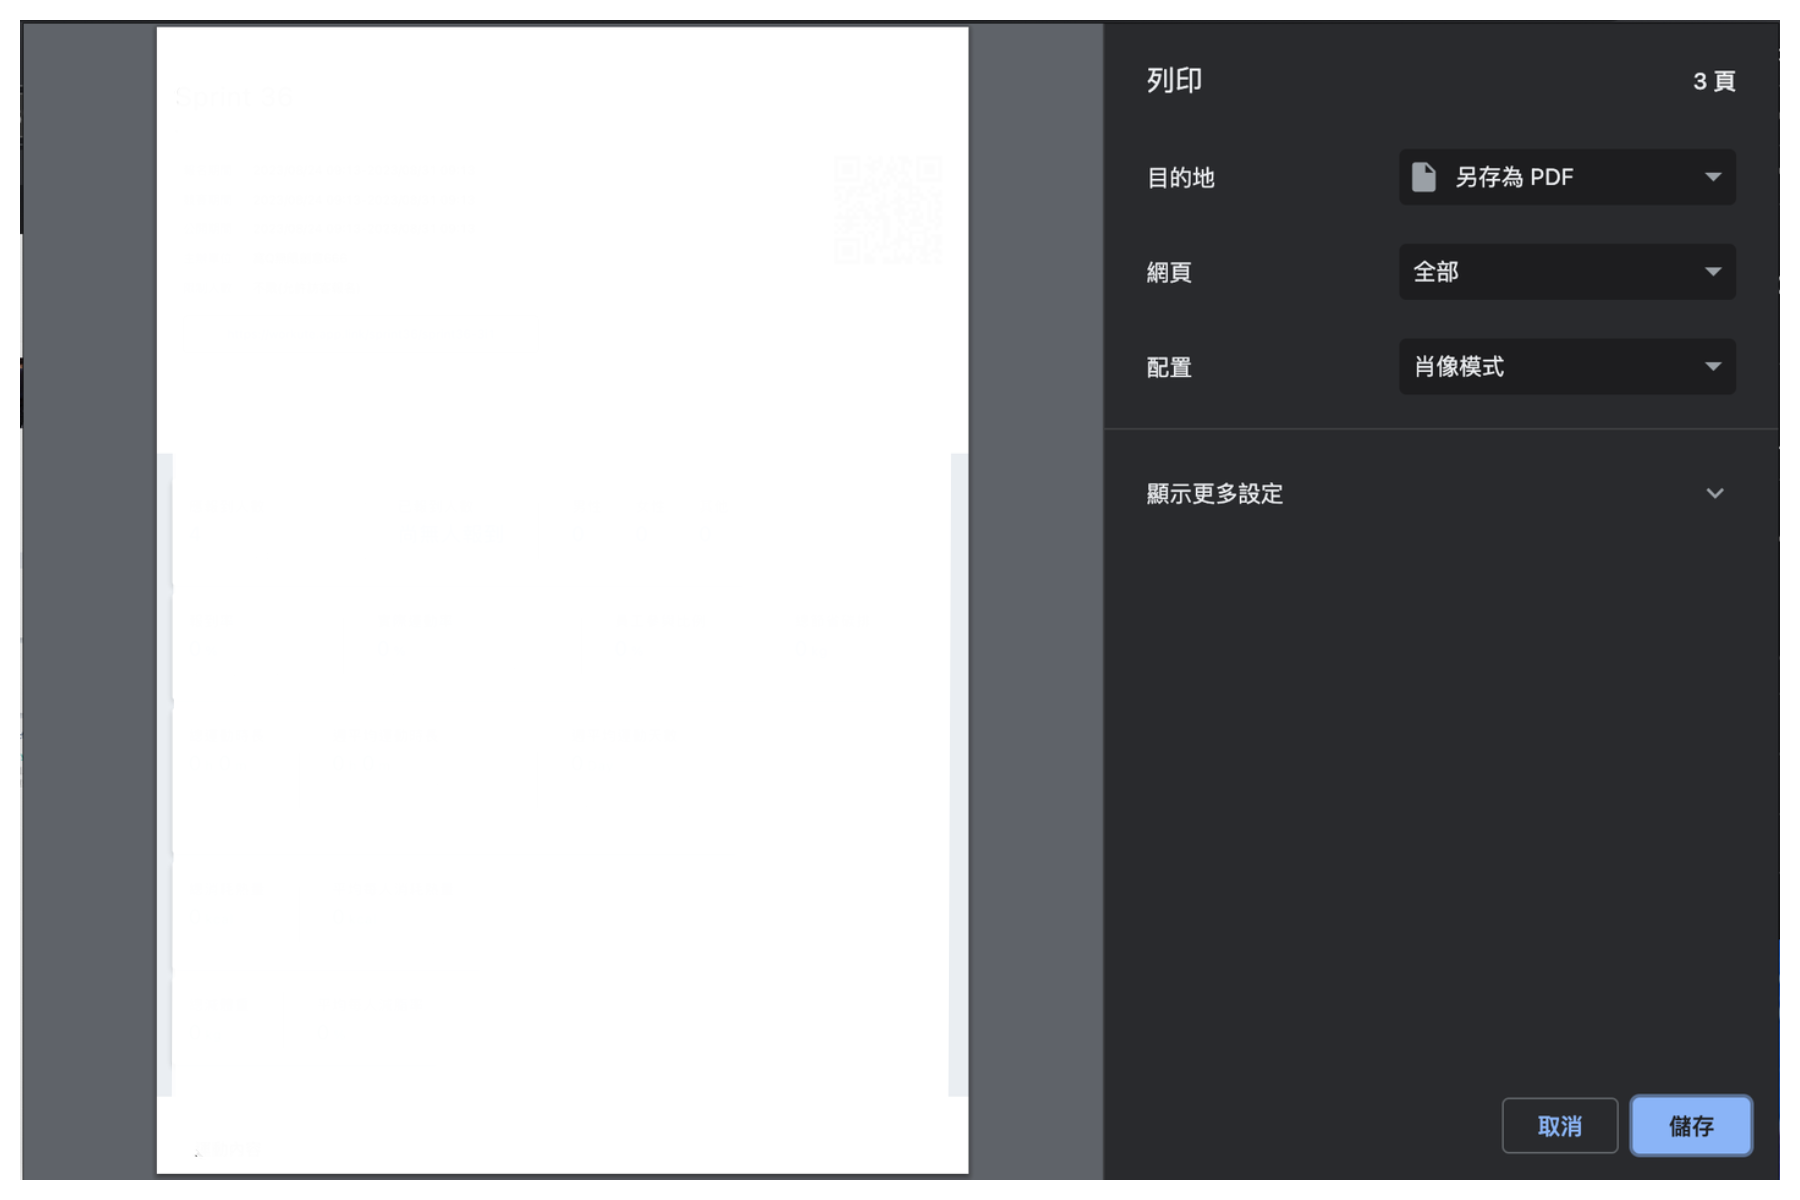
🖨 利用「列印」來實踐,下載要自己另存 以開發來說,只需要前端就能實踐,最簡單快速的方法就是利用 window.print 原生的列印功能去實作,但這個方法會跳出列印的視窗,且需要自己另存新檔才能真正的下載起來,也許使用上不是那麼便利,接著介紹兩種截然不同的方法來做。
1. window.print() + window.document.write 利用 window.print() 可以將 html 寫進頁面當中,但要讓畫面長的美麗會很~辛~苦!
window.print() 跳出列印功能的視窗window.open()可開啟連結至一個新的指定頁面
1
2
3
4
5
6
7
8
9
10
11
12
13
14
15
16
17
18
19
20
21
22
23
const handlePrintPage = ( const divElem = document .getElementById ('printArea' ).innerHTML ; const printWindow = window .open ('' , '' , 'height=400,width=800' ); printWindow.document .write ( '<html><head><title></title><link rel="stylesheet" type="text/css" href="/style/style.css"></head><body>' ); printWindow.document .write ('<antd/dist/antd.css>' ); printWindow.document .write ('</head><body >' ); printWindow.document .write (divElem); printWindow.document .write ('</body></html>' ); setTimeout (function ( printWindow.print (); }, 100 ); window .onfocus = function ( window .close (); }; };
2. React to print 👉 react-to-print
當然如果你的專案是 React 的話,有許多套件可以直接使用,其中 react-to-print 就非常方便,因為它可以將網頁上已經寫好的 component 直接列印出來,讓前端只需要再依據 A4 格式去調整列印的排版,當需求是先預覽後列印的話這個方法超級省事。
以下是起手式的範例參考:
1
2
3
4
5
6
7
8
9
10
11
12
13
14
15
16
17
18
19
20
import { useRef } from 'react' ;import { useReactToPrint } from 'react-to-print' ;const ReactToPrintSample = ( const ref = useRef (null ); const handlePrint = useReactToPrint ({ content : () => ref.current }); return ( <div > <button onClick ={handlePrint} > 列印 PDF</button > <PrintArea ref ={ref} > 要列印的內容</PrintArea > </div > ); }; export default ReactToPrintSample ;
上述的方法都會呼叫出瀏覽器的列印功能視窗,那有沒有方法可以直接「下載起來」,但又「不透過 Server 拿取檔案」呢?這個需求當初卡了我好多天,後來找到了兩個套件搭配的方式來實踐,但是這個方法坑超級多😉
🖼 利用「截圖」來實踐檔案下載 1. html2canvas + jsPDF 👉 html2canvas jsPDF
html2canvas 會將網頁裡的 Components 以類似「截圖」為一個個 canvas 元素的方式加入畫面。讓我們可以把網頁內容轉換為「圖片」,例如 PNG 格式,這樣可以進行保存、下載、分享。很適合用在局部截圖處理或是圖檔下載 。而 jsPDF 則是負責「生成 pdf」的這個動作,整個流程就是透過 html2canvas 把畫面截圖並一張張加入 jsPDF 生成的 pdf 頁面。聽起來沒有很難但實際寫起來卻很複雜,當初也是參考了很多教學,踩了很多坑才成功產生我們要的畫面。
1 2 3 4 5 6 7 8 9 10 11 12 13 14 15 16 17 18 19 20 21 22 23 24 25 26 27 28 29 30 31 32 33 34 35 36 37 38 39 40 41 42 43 44 45 46 47 48 49 50 51 52 53 54 55 56 57 58 59 60 61 62 63 64 65 66 67 68 69 70 71 72 73 74 const generatePDF = async ( const input = printRef.current !; try { const canvas = await html2canvas (input, { allowTaint : true , useCORS : true , backgroundColor : '#FFFFFF' , }); let leftHeight = canvas.height ; const a4Width = 595.28 ; const a4Height = 841.89 ; const a4HeightRef = Math .floor ((canvas.width / a4Width) * a4Height); let position = 0 ; const pdf = new jsPDF ('p' , 'pt' , 'a4' ); const createImpl = async (canvas ) => { if (position !== 0 ) { pdf.addPage (); } const pageCount = pdf.getNumberOfPages (); for (let i = 1 ; i <= pageCount; i++) { pdf.setPage (i); pdf.setFontSize (10 ); const pageWidth = pdf.internal .pageSize .width ; const pageHeight = pdf.internal .pageSize .height ; pdf.text (i.toString (), pageWidth - 40 , pageHeight - 20 ); } pdf.addImage ( canvasDraw.toDataURL ('image/jpeg' , 1.0 ), 'JPEG' , 0 , 10 , a4Width, (a4Width / canvasDraw.width ) * height ); leftHeight -= height; position += height; if (leftHeight > 0 ) { setTimeout (() => createImpl (canvas), 500 ); } else { pdf.save ('report.pdf' ); } }; if (leftHeight < a4HeightRef) { pdf.addImage (canvas.toDataURL ('image/jpeg' , 1.0 ), 'JPEG' , 0 , 0 , a4Width, (a4Width / canvas.width ) * leftHeight); pdf.save ('report.pdf' ); } else { await createImpl (canvas); } } catch (err) { console .error ("Error generating PDF:" , err); } };
不過故事不是只到這裡就結束,這個方法在電腦裝置上能夠很順的運行,雖然 canvas 耗時,十頁有圖文、表格的 pdf 大概會跑 10 秒左右,但裝置換到了手機上就 GG,特別是使用 iphone 只要頁面超過 7-8 頁,下載起來的 pdf 就會是全黑的,至今仍找不到原因,只能推測可能是記憶體和性能問題。
📁 還是後端產 pdf 最香! 為了徹底解決這個問題,誕生了下面這個方法,也是我們專案中最後採用的方法:透過後端去實踐。改成後端來產生 pdf,說香不是因為我就可以甩鍋,畢竟我們主管還是大膽的讓我繼續寫下去 😀
1. PdfMake(Node js 環境) 👉 PdfMake
在後端 Node js 環境以 Pdfmake 完成 pdf 的實踐方法不難,主要是在排版會比較花時間,畢竟沒有直覺的畫面可以參考,需要透過打測試 API 的方式來預覽排版結果,一開始不太習慣,但完成之後前端就可以輕鬆的在任何情境透過 API 取得 pdf 檔案,這個速度實在是比 html2canvas 快太多了。
以下是後端程式碼範例
1 2 3 4 5 6 7 8 9 10 11 12 13 14 15 16 17 18 19 20 21 22 23 24 25 26 27 28 29 30 31 32 33 34 35 36 37 38 39 40 41 42 43 44 45 46 47 48 49 50 51 52 53 54 55 56 57 58 59 60 const fonts = { Roboto : { normal : 'fonts/Roboto-Regular.ttf' , bold : 'fonts/Roboto-Medium.ttf' , italics : 'fonts/Roboto-Italic.ttf' , bolditalics : 'fonts/Roboto-MediumItalic.ttf' } }; const docDefinition = { content : [ '這是一個範例 PDF 文件。' , { table : { headerRows : 1 , body : [ ['欄位1' , '欄位2' , '欄位3' ], ['資料1' , '資料2' , '資料3' ], ['資料1' , '資料2' , '資料3' ] ] } } ] }; const buffer = await new Promise ((resolve ) => { const pdfDoc = pdfSetting.createPdfKitDocument (docDefinition); const chunks = []; pdfDoc.on ('data' , (chunk ) => { chunks.push (chunk); }); pdfDoc.on ('end' , () => { const bufferTest = Buffer .concat (chunks); resolve (bufferTest); }); pdfDoc.end (); }); return { buffer }; const result = await pdfService.generatePDF (your data from db); const fileName = `report_${data.name} .pdf` ; ctx.set ('Content-Disposition' , `attachment; filename=${fileName} ` ); ctx.set ('Content-Type' , 'application/pdf' ); return finalize (ctx, 200 , result.buffer );
以下是前端串接以取回檔案範例
1
2
3
4
5
6
7
8
9
10
11
12
13
14
15
16
17
18
19
20
21
22
23
24
25
26
27
28
29
30
31
32
33
34
35
36
37
38
39
const downloadPDFandSetOverlay = (programCode) { getReportDataFile (programCode) .then (response => const { data, headers } = response; const blob = new Blob ([data], { type : 'application/pdf' }); const url = window .URL .createObjectURL (blob); const fileName = extractFileName (headers['content-disposition' ]) || 'file.pdf' ; triggerDownload (url, fileName); setOverlayContent ({ text : '下載完成' }); }) .catch (error => setOverlayContent ({ text : '發生了一點問題,請重試' }); }); } const triggerDownload = (url, fileName ) => { const downloadLink = document .createElement ('a' ); downloadLink.href = url; downloadLink.download = fileName; document .body .appendChild (downloadLink); downloadLink.click (); document .body .removeChild (downloadLink); } const extractFileName = (contentDisposition ) => { if (contentDisposition) { const matches = contentDisposition.match (/filename\s*=\s*([^;\n]+)/i ); if (matches && matches.length > 1 ) { return matches[1 ].replace (/["']/g , '' ); } } return null ; }
💬 參考資料:
使用 html2canvas+jsPDF 实现纯前端 html 导出 pdf